Monday, November 29, 2010

ReportViewer Woes with Tight Integration between Visual Studio and SQL Server and No Backward Compatibility

Traffic Light ChaosLately I find myself creating some quick client reports (ProcessingMode=local) using the Visual Studio 2010 ReportViewer control and the Reporting Services Tablix control. The issue is that my customer is on SQL Server 2000, not 2008 as is officially supported by Visual Studio 2010 and the rdlc Reporting Build Provider. How do I know?

Mainly because of the following compile error:

“The report definition is not valid.  Details: The report definition has an invalid target namespace 'http://schemas.microsoft.com/sqlserver/reporting/2008/01/reportdefinition' which cannot be upgraded.”   

The lack of backward compatibility was not immediately obvious, but I still wanted the ability to use the newer Tablix functionality in the VS 2010 IDE and have the out-of-the-box export functionality of the Reporting Services client reports. I’m not a fan of workarounds as I have written about before, but occasionally under special circumstances with the pros and cons heavily considered, I entertain the idea. In this case, a SQL 2008 upgrade is on the schedule in the next few months.

Workaround for Visual Studio 2010

Visual Studio 2010 cannot use any of the SQL Datasource Wizards or any other database related wizards with a pre-2005 database, which is disappointing for anyone developing “big corporate” applications as they are often late adopters. To work around this limitation in development, I backed up my SQL Server 2000 database and restored it as a SQL Server 2005 database so I could use the IDE for the Create Report wizard. Obviously, prior to deploying to production SQL 2000 servers, the database DDL and DML changes need to be scripted back out (in SQL 80 compatibility mode) and tested against SQL 2000 instances. Please don’t skip this step!

Workaround for SQL Server 2000 RDLC format

This is my least favorite part of the work around because it can be easy to forget to undue before deployment.

The application I am working with is a website project, not a web application. The compile error occurs when I try to “Build” the project from the IDE “Build” menu. If instead, I just navigate to the web page the report is hosted in (hosting in IIS, not the IDE integrated web server), the page and its report render correctly with no errors. In order to use the IDE’s build functionality, I need to “exclude” the webpage and rdlc file it is using while working on other pages of the project.

To exclude a file from the project, right click the filename from the Solution Explorer window and click “Exclude from Project”. Excluding a file in VS 2010 renames the file to [filename].[ext].exclude so you may get a Visual Source Safe or Team Foundation prompt if your files are under source control (recommended).

When I am ready to deploy or test the pages with ReportViewer controls, it is necessary to un-“exclude” the report aspx pages and .rdlc report definitions.

photo credit: Andy Welsh / CC BY 2.0

Thursday, November 18, 2010

Five Reasons to Use a Staging Server

Concert Stage - Green DayIf you are interested in avoiding common and difficult to reverse issues when deploying new or updated software to a production environment, use a staging server – at a minimum. Your staging server should be configured as closely as possible to the production server. With virtualization, the process of cloning a server becomes a relatively trivial task.

A staging server provides a safe vehicle to “discover” and prevent commonly overlooked deployment issues:

  1. missing assembly references or resources. This is a frequent occurrence if you use third party tools like Infragistics, Telerik, or another. When you install the development tools, they often add the assemblies to the GAC on your development box and scripts and images to “special” virtual directories. If you blindly deploy an application to production without making sure you have the assemblies either in the GAC or referenced properly in your application, it can frequently lead to run time errors and the yellow screen of death. Even items you might think are part of the .Net Framework that are pre-loaded in your Visual Studio toolbox, such as the ReportViewer control require the installation of a ReportViewer Redistributable executable.
  2. dependencies on physical hardware. Depending on how the application is configured, your application may unwittingly be relying on a writeable F drive where on the server the F drive may not exist or may be a CD-ROM drive. Or require a 64 bit processor on a 32 bit server. It is better to catch these issues before deploying to production.
  3. require elevated file system permissions. If your application is writing XML files or storing media, the application upload path will require Write permissions for the accessing account. Permissions requirements should be part of the installation/upgrade process, not left to post installation troubleshooting.
  4. require least privileges on database permissions. You may be using the sa account (not recommended)on your development box, but your production DBA and/or company policies won’t appreciate that in production. This is an opportunity to make sure your application is running under an account or group with the least privileges necessary to run the application and make sure if your installation process is dropping/re-adding stored procedures or tables, you are also adding the appropriate grant select, insert, update, delete, execute, bulk insert, or truncate permissions to avoid unexpected SQL errors.
  5. require configuration changes to interface with other services, such as IIS version differences, SMTP, or Message Queues. On your development box, for simplicity, you might be using a local IIS SMTP service, or file system implementation to test emailing functionality, but if the production environment only allows mail to relay through a Microsoft Exchange endpoint, you have some additional configuration to do. Making sure all the appropriate accounts are understood and configured properly often takes coordination with other IT specialists. They’ll appreciate it if you coordinate it at their convenience on a staging server instead of elevating the issue to a production emergency.

This isn’t intended to be an all inclusive list, but hopefully if you are not using one today, it will inspire you to consider using one in the future. Prevention is the best medicine for software implementation.

The staging process provides an opportunity to perfect the installation process for a problem free installation. Additionally, having the installation process consolidated to a single series of installation and configurations steps in a single package with all the necessary files and scripts can simplify recreating software versions for disaster recovery purposes or for replicating to additional installation deployments, such as for different customers or at a different site.

Photo credit: Anirudh Koul / CC BY 2.0

Friday, November 5, 2010

Ajax Control Toolkit Modal Popup CSS Styling issue

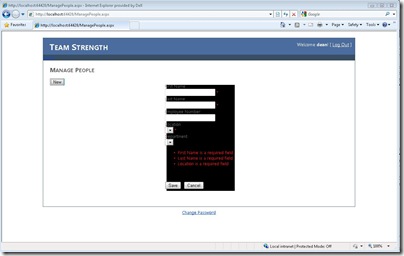
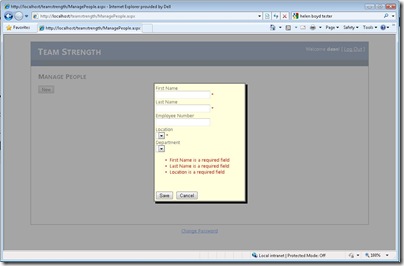
I found an interesting (and aggravating) difference between running a web application in the built-in Visual Studio 2010 development server vs. IIS 7 when using the Asp.Net 3.5 Ajax Control Toolkit ModalPopupExtender control. In the built-in web server (screenshot 1), the CSS formatting did not render correctly as it did in the application hosted in IIS7 (screenshot 2). Initially I used the standard styles you will find on the toolkit sample code.

Hopefully this will help some of the many other people that had the same problem.

Click the screenshots for enlarged views. The code used follows the screenshots.

ModalPopup Visual Studio Development Server

ModalPopup hosted in IIS

ManagePeople.aspx

<asp:ModalPopupExtender ID="pnlModalNew_ModalPopupExtender" runat="server" 
    DynamicServicePath="" Enabled="True" TargetControlID="btnNew"  PopupControlID="pnlModalNew"
    BackgroundCssClass="modalBackground" DropShadow="true" 
    CancelControlID="btnCancel" >
</asp:ModalPopupExtender>

Styles.css


/* Modal Popup */
.modalBackground {
    background-color:Gray;
    filter:alpha(opacity=70);
    opacity:0.7;
}
 
.modalPopup {
    background-color:#ffffdd;
    border-width:3px;
    border-style:solid;
    border-color:Gray;
    padding:3px;
    width:250px;
}

The Panel pnlModalNew referenced by the ModalPopupExtender that contains the data entry form fields had the CssClass style set to .modalPopup.

Tuesday, November 2, 2010

Asp.Net Mystery Membership Database

Sherlock HolmesI’ve used the built-in Asp.Net Membership Provider a number of times for its simplicity and straight forward API. There are a few mystical elements that can trip you up, if you don’t understand how the provisioning process works. There are two primary options:

  • manual
  • auto-magical

Manual

I generally create the membership database before I start working on the user interface (seems logical right?). I do that by running the membership provider wizard by opening a Command Prompt, navigating to the .Net 2.0 framework folder and running the aspnet_regsql.exe command (c:\windows\Microsoft.net\framework\v2.0.50727\aspnet_regsql.exe on a 32bit OS).

Command Prompt to run aspnet_regsql.exe

That launches the setup wizard where you can choose how you want the database configured in your SQL Server instance:

  • use an existing database such as the application database or
  • a stand-alone membership database if you want to have multiple applications use the same membership database

ASP.NET SQL Server Membership database setup wizard

The wizard then runs the necessary scripts against the selected database (creating the database if it doesn’t exist) and populates it with the tables, views, and stored procedures that the API uses to manage the membership details.

Auto-magical

In case you hadn’t guessed, this is method enshrouded by mystery (not really, but it can seem like it). If you don’t choose to manually create your membership database (via the wizard), then the default option as defined in the machine.config file is to use a SQL Express database which ends up getting created in the application’s App_Data folder in Visual Studio.

<connectionStrings>
        <add name="LocalSqlServer" connectionString="data source=.\SQLEXPRESS;Integrated Security=SSPI;AttachDBFilename=|DataDirectory|aspnetdb.mdf;User Instance=true" providerName="System.Data.SqlClient"/>
    </connectionStrings>

Depending on your version of Visual Studio and perhaps the method you use to initiate the creation of this database, it might not be obvious exactly where the database is or how it is configured to point to that database file. The corresponding connection string doesn’t necessarily show up in the web.config file because it is inherited from the one defined in the machine.config.

There are multiple ways you can initiate the creation of the membership database. A couple include:

  1. Select “ASP.NET Configuration” from the Visual Studio “Project” menu (screenshot is from VS 2010).image
  2. Drag a login control onto the design surface and select “Administer Website” from its context menu.Administer Website method of creating ASPNETDB.MDF

Upon first use of adding a user, role, or other activity a SQL Express database (ASPNETDB.MDF) will be created including the membership provider’s tables, views, and stored procedures used to manage the membership and personalization system.

Mystery

In a quick prototype project, I used the auto-magical process and added a few users. You will notice in the App_Data folder, there doesn’t appear to be an ASPNETDB.MDF, only a TeamStrength.mdf file, so where are my users stored?

ASPNETDB.MDF is not visible in Visual Studio Solution Explorer

Upon closer inspection with Windows Explorer, there actually is a membership database in that folder. ASPNETDB.MDF is visible from Windows Explorer

Mystery solved.

You may also be interested in my introduction to implementing ASP.NET Role Based Security presentation or the code samples from the presentation can be found through a link on that blog post.

Photo credit: m_bahareth / CC BY 2.0